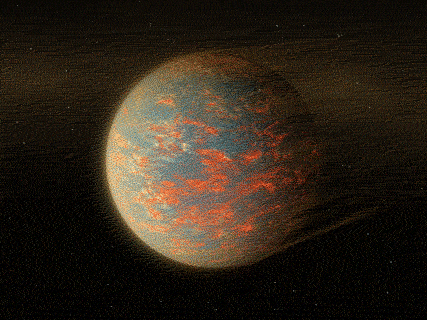
Hunting worlds beyond our solar system.
Our Solar System formed around 4600 million years ago. We know this from the study of meteorites and radioactivity. It all began with a cloud of gas and dust. A nearby supernova explosion probably perturbed the calm cloud, which then started to contract due to gravity, forming a flat, rotating disk with most of the material concentrated in the center: the protosun. Later, gravity pulled the rest of the material into clumps and rounded some of them, forming the planets and dwarf planets. The leftovers resulted in comets, asteroids, and meteoroids.
But what are Exoplanets?
Exoplanets are planets beyond our own solar system. Thousands have been discovered in the past two decades, mostly with NASA’s Kepler Space Telescope.
These exoplanets come in a huge variety of sizes and orbits. Some are gigantic planets hugging close to their parent stars; others are icy, some rocky. NASA and other agencies are looking for a special kind of planet: one that’s the same size as Earth, orbiting a sun-like star in the habitable zone.
The habitable zone is the area around a star where it is not too hot and not too cold for liquid water to exist on the surface of surrounding planets. Imagine if Earth was where Pluto is. The Sun would be barely visible (about the size of a pea) and Earth’s ocean and much of its atmosphere would freeze.

Wanna know more? check out this link: Exoplanets: Worlds Beyond Our Solar System
Why even search for exoplanets?
There are about 100,000,000,000 stars in our Galaxy, the Milky Way. How many exoplanets — planets outside of the Solar System — do we expect to exist? Why are some stars surrounded by planets? How diverse are planetary systems? Does this diversity tell us something about the process of planet formation? These are some of the many questions that motivate the study of exoplanets. Some exoplanets may have the necessary physical conditions (amount and quality of light from the star, temperature, atmospheric composition) for the existence of complex organic chemistry and perhaps for the development of Life (which may be quite different from Life on Earth).
However, detecting exoplanets is no simple task. We may have imagined life on other planets in books and film for centuries, but detecting actual exoplanets is a recent phenomenon. Planets on their own emit very little if any light. We can only see Jupiter or Venus in the night sky because they reflect the sun’s light. If we were to look at an exoplanet (the nearest one is over 4 light-years away), it would be very close to a brilliantly lit star, making the planet impossible to see.
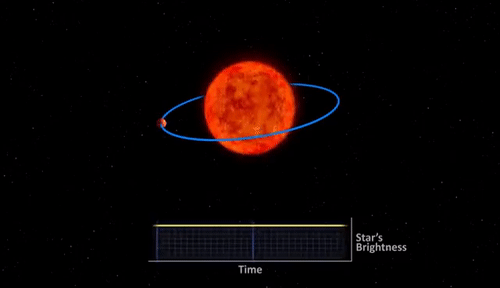
Scientists discovered a very efficient way to study these occurrences; planets themselves do not emit light, but the stars around which they orbit do. Considering this fact into account scientists at NASA developed a method which they called Transit method in which a digital-camera-like technology is used to detect and measure tiny dips in a star’s brightness as a planet crosses in front of the star. With observations of transiting planets, astronomers can calculate the ratio of a planet’s radius to that of its star — essentially the size of the planet’s shadow — and with that ratio, they can calculate the planet’s size.
Kepler Space Telescope’s primary method of searching for planets was the “Transit” method.
Transit method: In the diagram below, a star is orbited by a planet. From the graph, it is visible that the starlight intensity drops because it is partially obscured by the planet, given our position. The starlight rises back to its original value once the planets crosses in front of the star.
Until just a few years ago, astronomers had only confirmed the presence of fewer than a thousand exoplanets. Then came the Kepler mission, and the number of exoplanets exploded. The Kepler mission is sadly over in 2018, but the TESS mission or Transiting Exoplanet Survey Satellite has taken its place and is regularly finding new exoplanets in the night sky. TESS is monitoring the brightness of stars for periodic drops caused by planet transits. The TESS mission is finding planets ranging from small, rocky worlds to giant planets, showcasing the diversity of planets in the galaxy.
I wanted to see if I could look at the available exoplanet data and make predictions about which planets might be hospitable to life. The data made publicly available by NASA is beautiful in that it contains many useful features. The goal is to create a model that can predict the existence of an Exoplanet, utilizing the flux (light intensity) readings from 3198 different stars over time.
The dataset can be downloaded from here.
Lets us start by importing all the libraries:
import os
import warnings
import math
warnings.filterwarnings('ignore')
import numpy as np
import pandas as pd
import matplotlib.pyplot as plt
plt.style.use('fivethirtyeight')
from pylab import rcParams
rcParams['figure.figsize'] = 10, 6
from sklearn.metrics import mean_squared_error, mean_absolute_error
from imblearn.over_sampling import SMOTE
from sklearn.model_selection import train_test_split
from sklearn import linear_model
from sklearn.model_selection import cross_val_score
from sklearn.metrics import precision_score, recall_score,roc_curve,auc, f1_score, roc_auc_score,confusion_matrix, accuracy_score, classification_report
from sklearn.preprocessing import StandardScaler, normalize
from scipy import ndimage
import seaborn as sns
Load the train and test data.
test_data = pd.read_csv('/Users/nageshsinghchauhan/Downloads/ML/kaggle/exoplanet/exoTest.csv').fillna(0)

train_data = pd.read_csv('/Users/nageshsinghchauhan/Downloads/ML/kaggle/exoplanet/exoTrain.csv').fillna(0)

train_data.head()
Dataset
Now the target column LABEL consists of two categories 1(Does not represents exoplanet) and 2(represents the presence of exoplanet). So, convert them to binary values for easier processing of data.
categ = {2: 1,1: 0}
train_data.LABEL = [categ[item] for item in train_data.LABEL]
test_data.LABEL = [categ[item] for item in test_data.LABEL]
Before moving forward let us also reduce the amount of memory used by both test and train data frames.
#Reduce memory
def reduce_memory(df):
    """ iterate through all the columns of a dataframe and modify the data type
        to reduce memory usage.
    """
    start_mem = df.memory_usage().sum() / 1024**2
    print('Memory usage of dataframe is {:.2f} MB'.format(start_mem))

    for col in df.columns:
        col_type = df[col].dtype

        if col_type != object:
            c_min = df[col].min()
            c_max = df[col].max()
            if str(col_type)[:3] == 'int':
                if c_min > np.iinfo(np.int8).min and c_max < np.iinfo(np.int8).max:
                    df[col] = df[col].astype(np.int8)
                elif c_min > np.iinfo(np.int16).min and c_max < np.iinfo(np.int16).max:
                    df[col] = df[col].astype(np.int16)
                elif c_min > np.iinfo(np.int32).min and c_max < np.iinfo(np.int32).max:
                    df[col] = df[col].astype(np.int32)
                elif c_min > np.iinfo(np.int64).min and c_max < np.iinfo(np.int64).max:
                    df[col] = df[col].astype(np.int64)
            else:
                if c_min > np.finfo(np.float16).min and c_max < np.finfo(np.float16).max:
                    df[col] = df[col].astype(np.float16)
                elif c_min > np.finfo(np.float32).min and c_max < np.finfo(np.float32).max:
                    df[col] = df[col].astype(np.float32)
                else:
                    df[col] = df[col].astype(np.float64)
        else:
            df[col] = df[col].astype('category')end_mem = df.memory_usage().sum() / 1024**2
    print('Memory usage after optimization is: {:.2f} MB'.format(end_mem))
    print('Decreased by {:.1f}%'.format(100 * (start_mem - end_mem) / start_mem))
    return dftest_data = reduce_memory(test_data)#Output
Memory usage of dataframe is 13.91 MB
Memory usage after optimization is: 6.25 MB
Decreased by 55.1%
This step is for memory optimization purpose and has reduced the memory usage of test_data dataframe by 55.1%, you can do that for train_data data frame also.
Now visualize the target column in the train_dataset and get an idea about the class distribution.
plt.figure(figsize=(6,4))
colors = ["0", "1"]
sns.countplot('LABEL', data=train_data, palette=colors)
plt.title('Class Distributions \n (0: Not Exoplanet || 1: Exoplanet)', fontsize=14)
Class distribution of Target variable.
It turns out that the data is highly imbalanced. So first let us start with data preprocessing techniques.
Let us plot the first 4 rows of the train data and observe the intensity of flux values.
from pylab import rcParams
rcParams['figure.figsize'] = 13, 8
plt.title('Distribution of flux values', fontsize=10)
plt.xlabel('Flux values')
plt.ylabel('Flux intensity')
plt.plot(train_data.iloc[0,])
plt.plot(train_data.iloc[1,])
plt.plot(train_data.iloc[2,])
plt.plot(train_data.iloc[3,])
plt.show()
Well, our data is clean but is not normalized. Let us plot the Gaussian histogram of non-exoplanets data.
labels_1=[100,200,300]
for i in labels_1:
    plt.hist(train_data.iloc[i,:], bins=200)
    plt.title("Gaussian Histogram")
    plt.xlabel("Flux values")
    plt.show()
Absence of exoplanets
Now plot Gaussian histogram of the data when exoplanets are present.
labels_1=[16,21,25]
for i in labels_1:
    plt.hist(train_data.iloc[i,:], bins=200)
    plt.title("Gaussian Histogram")
    plt.xlabel("Flux values")
    plt.show()
Presence of exoplanets
So let us first split our dataset and normalize it.
x_train = train_data.drop(["LABEL"],axis=1)
y_train = train_data["LABEL"]
x_test = test_data.drop(["LABEL"],axis=1)
y_test = test_data["LABEL"]
Data Normalization is a technique often applied as part of data preparation for machine learning. The goal of normalization is to change the values of numeric columns in the dataset to a common scale, without distorting differences in the ranges of values.
x_train = normalized = normalize(x_train)
x_test = normalize(x_test)
The next step is to apply gaussian filters to both test and train.
In probability theory, the normal (or Gaussian or Gauss or Laplace–Gauss) distribution is a very common continuous probability distribution. Normal distributions are important in statistics and are often used in the natural and social sciences to represent real-valued random variables whose distributions are not known.
The normal distribution is useful because of the central limit theorem. In its most general form, under some conditions (which include finite variance), it states that averages of samples of observations of random variables independently drawn from the same distribution converge in distribution to the normal, that is, they become normally distributed when the number of observations is sufficiently large. Physical quantities that are expected to be the sum of many independent processes often have distributions that are nearly normal.
x_train = filtered = ndimage.filters.gaussian_filter(x_train, sigma=10)
x_test = ndimage.filters.gaussian_filter(x_test, sigma=10)
we use feature scaling so that all the values remain in the comparable range.
#Feature scaling
std_scaler = StandardScaler()
x_train = scaled = std_scaler.fit_transform(x_train)
x_test = std_scaler.fit_transform(x_test)
The number of columns/features that we have been working with is huge. We have 5087 rows and 3198 columns in our training dataset. Basically we need to decrease the number of features(Dimentioanlity Reduction) to remove the possibility of Curse of Dimensionality.
For reducing the number of dimensions/features we will use the most popular dimensionality reduction algorithm i.e. PCA(Principal Component Analysis).
To perform PCA we have to choose the number of features/dimensions that we want in our data.
#Dimentioanlity reduction
from sklearn.decomposition import PCA
pca = PCA()
X_train = pca.fit_transform(X_train)
X_test = pca.transform(X_test)
total=sum(pca.explained_variance_)
k=0
current_variance=0
while current_variance/total < 0.90:
    current_variance += pca.explained_variance_[k]
    k=k+1
The above code gives k=37.
Now let us take k=37 and apply PCA on our independent variables.
#Apply PCA with n_componenets
pca = PCA(n_components=37)
x_train = pca.fit_transform(x_train)
x_test = pca.transform(x_test)
plt.figure()
plt.plot(np.cumsum(pca.explained_variance_ratio_))
plt.xlabel('Number of Components')
plt.ylabel('Variance (%)') #for each component
plt.title('Exoplanet Dataset Explained Variance')
plt.show()
The above plot tells us that selecting 37 components we can preserve something around 98.8% or 99% of the total variance of the data. It makes sense, we’ll not use 100% of our variance, because it denotes all components, and we want only the principal ones.

The number of columns got reduced to 37 in both test and train datasets.
Now moving on to the next step, as we know the target class is not equally distributed and one class dominates the other. So we need to resample our data so that the target class is equally distributed.
There are 4 ways of addressing class imbalance problems like these:
Synthesis of new minority class instances
Over-sampling of minority class
Under-sampling of the majority class
Tweak the cost function to make misclassification of minority instances more important than misclassification of majority instances.
#Resampling
print("Before OverSampling, counts of label '1': {}".format(sum(y_train==1)))
print("Before OverSampling, counts of label '0': {} \n".format(sum(y_train==0)))sm = SMOTE(random_state=27, ratio = 1.0)
x_train_res, y_train_res = sm.fit_sample(x_train, y_train.ravel())print("After OverSampling, counts of label '1': {}".format(sum(y_train_res==1)))
print("After OverSampling, counts of label '0': {}".format(sum(y_train_res==0)))
We have used the SMOTE(Synthetic Minority Over-sampling TEchnique) resampling method. It is an over-sampling method. What it does is, it creates synthetic (not duplicate) samples of the minority class. Hence making the minority class equal to the majority class. SMOTE does this by selecting similar records and altering that record one column at a time by a random amount within the difference to the neighboring records.
Before OverSampling, counts of label '1': 37
Before OverSampling, counts of label '0': 5050

After OverSampling, counts of label '1': 5050
After OverSampling, counts of label '0': 5050
Now it comes to building a model that can classify exoplanets on the test data.
So I’ll create a function model which will:
fit the model
perform Cross-validation
Check the Accuracy of our model
generate Classification report
generate Confusion matrix
def model(classifier,dtrain_x,dtrain_y,dtest_x,dtest_y):
    #fit the model
    classifier.fit(dtrain_x,dtrain_y)
    predictions = classifier.predict(dtest_x)

    #Cross validation
    accuracies = cross_val_score(estimator = classifier, X = x_train_res, y = y_train_res, cv = 5, n_jobs = -1)
    mean = accuracies.mean()
    variance = accuracies.std()
    print("Accuracy mean: "+ str(mean))
    print("Accuracy variance: "+ str(variance))

    #Accuracy
    print ("\naccuracy_score :",accuracy_score(dtest_y,predictions))

    #Classification report
    print ("\nclassification report :\n",(classification_report(dtest_y,predictions)))

    #Confusion matrix
    plt.figure(figsize=(13,10))
    plt.subplot(221)
    sns.heatmap(confusion_matrix(dtest_y,predictions),annot=True,cmap="viridis",fmt = "d",linecolor="k",linewidths=3)
    plt.title("CONFUSION MATRIX",fontsize=20)
There is always a need to validate the stability of your machine learning model. I mean you just can’t fit the model to your training data and hope it would accurately work for the real data it has never seen before. You need some kind of assurance that your model has got most of the patterns from the data correct, and it's not picking up too much on the noise, or in other words its low on bias and variance.
Now fit the Support Vector Machine (SVM) algorithm to the training set and do prediction.
from sklearn.svm import SVC
SVM_model=SVC()
model(SVM_model,x_train_res,y_train_res,x_test,y_test)
Also, try the Random forest model and get the feature importance but before doing that include below code in the function model.
#Display feature importance
    df1 = pd.DataFrame.from_records(dtrain_x)
    tmp = pd.DataFrame({'Feature': df1.columns, 'Feature importance': classifier.feature_importances_})
    tmp = tmp.sort_values(by='Feature importance',ascending=False)
    plt.figure(figsize = (7,4))
    plt.title('Features importance',fontsize=14)
    s = sns.barplot(x='Feature',y='Feature importance',data=tmp)
    s.set_xticklabels(s.get_xticklabels(),rotation=90)
    plt.show()
and call the Random forest classification algorithm.
from sklearn.ensemble import RandomForestClassifier
rf_classifier = RandomForestClassifier()

model(rf_classifier,x_train_res,y_train_res,x_test,y_test)
Generally, Feature importance provides a score that indicates how useful or valuable each feature was in the construction of the model. The more an attribute is used to make key decisions with decision trees, the higher its relative importance.

We can see that we are getting pretty good results from SVM and Random forest algorithms. However, you can go ahead and tweak the parameters and also use other algorithms and check the difference in Accuracy.
You can also find the code on my Github : https://github.com/nageshsinghc4/Exoplanet-exploration
Conclusion: The Future
It’s amazing we are able to gather light from distant stars, study this light that has been traveling for thousands of years, and make conclusions about what potential worlds these stars might harbor.

Credits: astrobiology
Within the next 10 years, 30 to 40m diameter telescopes will operate from the Earth to detect exoplanets by imaging and velocity variations of the stars. Satellite telescopes including Cheops, JWST, Plato, and Ariel, will be launched to detect planets by the transit method. The JWST will also do direct imaging. Large Space telescopes 8 to18m in diameter (LUVOIR, Habex) are being designed at NASA to detect signs of life on exoplanets by 2050.
In the more distant future, huge space interferometers will make detailed maps of planets. And possibly, interstellar probes will be launched towards the nearest exoplanets to take close-up images. Engineers are already working on propulsion techniques to reach such distant targets.
So in this article, we predicted the presence of an exoplanet using machine learning models and neural networks.
Well, that’s all for this article hope you guys have enjoyed reading it. I’ll be glad if the article is of any help. Feel free to share your thoughts/feedback in the comment section.